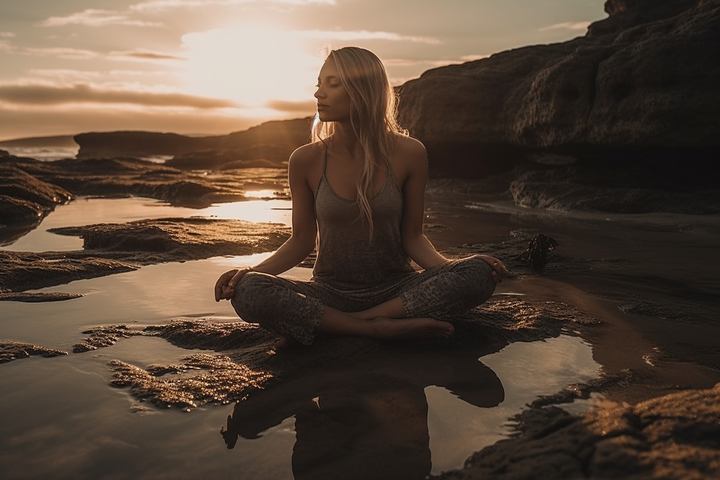
Discover the Healing Power of Supported Bound Angle Pose (Salamba Baddha Konasana)
Supported Bound Angle Pose is more than just a restorative yoga pose. It offers both physical and mental benefits that can greatly enhance your quality of life. Incorporate it into your yoga practice to discover a deeper sense of peace, better flexibility, and a centered mind.

Welcome to this all-encompassing guide on Supported Bound Angle Pose or Salamba Baddha Konasana (pronounced Suh-LUHM-buh Bah-DUH Koh-NAH-suh-nuh).
A variation of the classic Baddha Konasana, this pose combines the essence of relaxation and restoration.
Historical Background: The Foundations of Salamba Baddha Konasana
This pose has its roots in traditional yoga, but its supportive variant is more contemporary, aiming to make the classic pose accessible to people of all body types and levels. The name is derived from Sanskrit where "Salamba" means supported, "Baddha" means bound, and "Konasana" means angle.
Understanding the Differences: Supported Bound Angle Pose vs. Regular Bound Angle Pose
While both Supported Bound Angle Pose (Salamba Baddha Konasana) and regular Bound Angle Pose (Baddha Konasana) share a similar structure and aim to stretch the inner thighs, hips, and groin, there are some distinct differences between the two that offer unique benefits and challenges. Here's how they differ:
Level of Support
The most obvious difference lies in the support used in the Supported Bound Angle Pose. Props like cushions, blankets, or blocks are strategically placed to provide extra support, making it more accessible for beginners or those with certain physical limitations.
Depth of Stretch
In the Supported version, the use of props allows you to relax deeper into the pose, encouraging a more profound stretch. In contrast, the regular version often requires more active engagement of muscles to maintain the position, making it a bit more strenuous.
Duration of the Pose
Supported Bound Angle Pose is typically held for a longer duration, sometimes even up to 10 minutes, to allow for deeper relaxation and to facilitate a meditative state. The regular version is generally held for a shorter period, focusing more on the active stretching aspect.
Focus on Relaxation vs. Active Engagement
The supported version leans more towards relaxation and is often used in Restorative Yoga practices. It allows the practitioner to focus on breath, alignment, and the subtle release of tension. In contrast, the regular Bound Angle Pose is more often found in active yoga sequences that aim to stretch and strengthen the muscles.
Postural Adjustments
In the Supported Bound Angle Pose, because you are more relaxed and supported, it's easier to focus on subtle postural adjustments like spinal alignment, which might be overshadowed in the regular version due to the active muscle engagement required.
Step-By-Step Instructions: Master the Supported Bound Angle Pose
Step 1: Prepare Your Space
Before you begin, choose a quiet space where you won't be disturbed. Lay a yoga mat on a flat surface and make sure your props—usually two blocks or bolsters—are within arm's reach. Take a few moments to sit quietly, preparing your mind for the practice.
Step 2: Establish a Strong Base
Sit on your yoga mat with your legs extended in front of you. Sit up tall, as if a string is pulling the crown of your head towards the ceiling. This will help you establish a strong base and make it easier to maintain your posture throughout the pose.
Step 3: Fold Your Legs into Position
Gently bend your knees and pull the soles of your feet together. Allow your knees to drop outwards, creating a diamond shape with your legs. This is the basic shape for Bound Angle Pose.
Step 4: Fine-Tuning the Leg Position
Adjust the distance between your pelvis and your feet to find the optimal stretch for your inner thighs and groin area. There's no one-size-fits-all distance, so take the time to find what feels right for you.
Step 5: Arrange Your Props
Carefully place a yoga block or bolster under each knee. The height and type of prop you choose depend on your level of flexibility. The prop is meant to support your knee and make the pose more comfortable, allowing you to maintain it for a longer period.
Step 6: Align Your Spine
With your props in place, refocus on your posture. Make sure your back is straight, your shoulders are relaxed, and your neck is in a neutral position. This spinal alignment is crucial for the effectiveness of the pose.
Step 7: Hand Placement
Rest your hands on your ankles or feet. This can help you maintain balance and keep your spine straight. If you find it more comfortable, you can also place your hands on your lap, palms facing upwards.
Step 8: Shoulder Relaxation Techniques
Allow your shoulders to drop away from your ears. If you find it challenging to relax your shoulders, take a few deep breaths while consciously focusing on releasing tension from that area.
Step 9: Activate Your Core and Open Your Chest
Engage your abdominal muscles lightly to protect your lower back. Simultaneously, think about opening your chest by gently squeezing your shoulder blades together. Imagine a string pulling you up from the crown of your head.
Step 10: The Importance of Breath
Your breath is a powerful tool in yoga. Close your eyes and bring your attention to your breathing. Inhale deeply through the nose and exhale fully, also through the nose. Allow each breath to relax you further into the pose.
Step 11: Holding the Pose
Once you're comfortable, try to hold the pose for an extended period. For beginners, 1-3 minutes is a good starting point. More advanced practitioners can aim for up to 5 minutes or more.
Step 12: Mindful Exit
When you're ready to exit the pose, gently lift your knees and remove the blocks or bolsters from underneath. Extend your legs in front of you and give them a gentle shake to release any tension. Sit quietly for a few moments, taking a few deep breaths to ground yourself and conclude your practice.
Complementary Supported Poses: Complete Your Yoga Routine
When it comes to optimizing your yoga routine, choosing the right complementary poses can make all the difference, especially when practicing Supported Bound Angle Pose. Here are some poses that offer added support and can easily be integrated into your sequence for a comprehensive experience.
Supported Child's Pose (Salamba Balasana)
Adding props to Child’s Pose offers additional support to the back and hips, mimicking the relaxation and release found in Supported Bound Angle Pose. This creates a soothing effect, perfect for transitioning between poses.
Supported Pigeon Pose (Salamba Eka Pada Rajakapotasana)
Introducing props like cushions or blocks under the hips in Pigeon Pose provides extra support, which can deepen the stretch and make it more accessible. The enhanced hip opening complements the focus of Supported Bound Angle Pose.
Supported Bridge Pose (Salamba Setu Bandha Sarvangasana)
By using a block or bolster under the lower back, this version of Bridge Pose offers extra support and enables you to open your chest more freely. This helps balance the hip and chest opening aspects of Supported Bound Angle Pose.
Supported Corpse Pose (Salamba Savasana)
A blanket under the head or a bolster under the knees can make Savasana even more relaxing. This supported variant of Corpse Pose can deepen the sense of relaxation and surrender that comes from practicing Supported Bound Angle Pose.
Conclusion: Experience the Tranquility of Supported Bound Angle Pose
As you can see, Supported Bound Angle Pose is more than just a restorative yoga pose. It offers both physical and mental benefits that can greatly enhance your quality of life. Incorporate it into your yoga practice to discover a deeper sense of peace, better flexibility, and a centered mind.
If you found this information valuable and would like to stay updated on more yoga insights, tips, and practices, feel free to subscribe 🧘

Comments ()